

So a few weeks ago I was completely thrilled to be invited to test out a new WRMK product for their DIY Party range. When I opened my box to find the cutest mini piñatas you could imagine, along with fringe tape and confetti, my mind started to buzz with ideas!

I was lucky enough to receive the mini circles which are a great versatile shape to work with.


The handbags were a hit!

Despite their small stature, these little piñatas actually fit quite a bit inside! The confetti (available in rainbow brights and beautiful gold & silver metallics) added even more fun to the colourful hidden surprise!

Let me show you how I went about creating the bags
The piñatas themselves come plain for you to decorate yourself. They are made from a sturdy card which is uncoated on the outside and coated on the inside for a nice finish. I traced around a circle onto some pink cardstock, which I then cut out and adhered to the one side. This will be the 'back' of the bag, which will be against the child's body.

I measured a length of ribbon for the strap of the bag and then adhered one end to opposite sides of the circle using Helmar 450 glue. The reason I put the strap on now is so that it will have a neat finish once I applied the fringe tape over the top.

The paper fringe tape comes ready-to-use with double sided tape. Simple remove the paper backing and you're ready to go! Each pack comes with enough tape to wrap one piñata.

To keep a bit of the traditional piñata style, I've layered up some colours, using 'Blossom' and 'Twilight'. Another nice feature of these tapes is that most of them (excl. white, black and metallics) come with two tones of the same colour in a pack, so you can create visual interest with only one pack if you like.

In order for my little bags to be opened and closed, I have used some magnetic tape and popped some on the flap and on the opening of the circle. This is an easy method that doesn't require fiddly fastners for little hands. FYI: See those little holes? They are so you can hang your piñata from the ceiling or add some balloons.

For the outer edge of this bag, I have used gold metallic tape cut to short lengths and layered. TIP: It is easier to add tape over the top of each other than it is to try and tuck underneath the above piece, IYKWIM!

This purple and pink bag has a decorative heart on the front which I created very easily using a simple shape cut from plain white card.
I applied a liberal amount of adhesive over the top and sprinkled a mixture of the colourful and metallic confetti on top. I applied a few more individual confetti bits so it had a even mix and finished it off with a couple of WRMK adhesive sequins and some tiny rhinestones.


As a final flourish, I've run some white fringe tape around the circumference of the heart and then popped it on to some foam tape so it would stand out a bit against the background. So sweet.

The other bag I made using the same method, but this one has a cute floral theme on the front. To make some leaves, I stuck two bits of tape together, fringe facing outwards.

I then snipped around, creating a leaf shape. You'll notice I've left a bit of the middle tape part for the bottom of the leaf.

To create the flower petals, I've rolled some white tape around my finger...
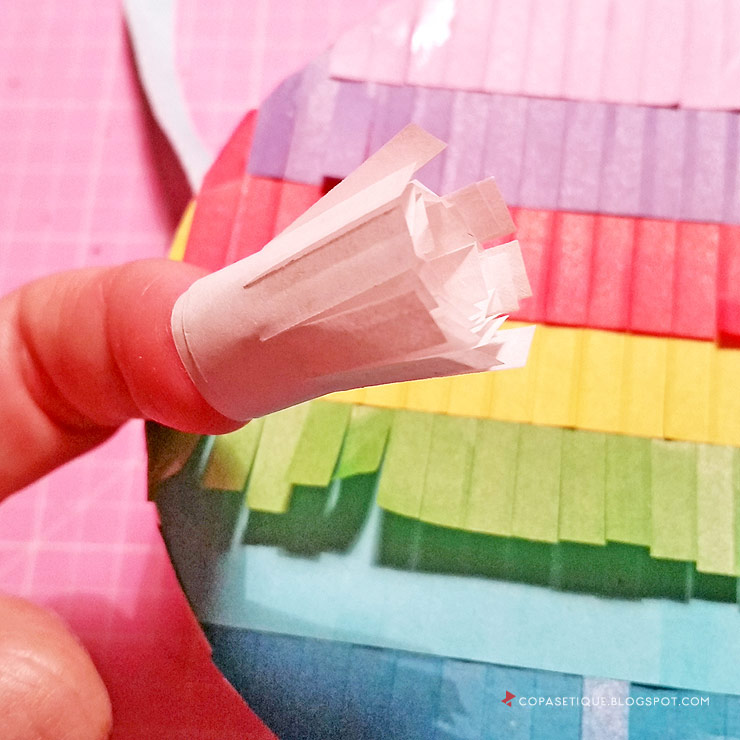
and then pulled the 'petals' open...

Pop an oversize rhinestone, button or brad in middle and you've got a flower!

The girls couldn't wait to see what was inside their special bags.


Now for those of you who have special little boys in your life, I also have one more idea for you... how about creating your own teeny drum sets?

Baby K was delighted to bang on his piñata drum!

Cute treasures for cute bubs waiting inside...

For the striped pattern on the side, I first layered light blue tape from a pack of 'Sky' so that the taped part was roughly in the centre....

I then took two strips of the darker blue and taped them, fringe facing out, on either side leaving the light blue in the middle.

The fringe tape had covered the holes, but I poked two more so I could run a bit of cord through them which was attached to my drumsticks.

Look at his little face as he discovers the hidden treats!

Thank you WRMK for allowing me to have such fun with these super cute piñatas!
** Check out the We R Memory Keepers blog here to find out more about these adorable Piñatas PLUS enter the giveaway to WIN some of your own! Winner will be drawn tomorrow.
Thank you so much for stopping by!


Love your terrific ideas and great tutorial of putting it together!
ReplyDelete