There are a few days left to get your entries in for the December kraftboard over at Kraft Plus Challenges. This month there is a 'Wanderlust' theme with the criteria being:
Kraft + Travel + Maps
I was completely inspired by the suitcase in the photos. There are so many places I would still like to visit! I found the cutest suitcase cut file in the Silhouette online store and created this travel case using Simple Stories 'Summer Vibes' and 'So Fancy.
There is a little drawer which slides out to reveal four mini albums, one for each of the four holidays we took over the course of 2005...
Hello Amsterdam, Greece, Paris and South Africa!
The albums have been simply bound using a book ring. Each has about 6 pages, with a postcard at the end (old October Afternoon) where I can jot down my memories. To save you trying to decipher my scrawl, I hadn't written on them for the photos, hehe.
The inside of the Amsterdam one. My printer was running out of ink by this stage, so the photos are a little washed out, unfortunately.
Greece:
South Africa. How I miss that beautiful mountain!
All pretty simply embellished, but so cute together.
Thank you so much for stopping by today. Sadly, this will be my last DT project on the K+ team. I have loved the clever challenges Sandra has put together for all of us kraft lovers and can't wait to see what amazing creations will be coming out of the K+ group next year!
I hope you will get a chance to play along if you haven't already.
Take care,
Tuesday, 29 December 2015
Monday, 14 December 2015
We R Memory Keepers DIY Piñatas
So a few weeks ago I was completely thrilled to be invited to test out a new WRMK product for their DIY Party range. When I opened my box to find the cutest mini piñatas you could imagine, along with fringe tape and confetti, my mind started to buzz with ideas!
I was lucky enough to receive the mini circles which are a great versatile shape to work with.
The handbags were a hit!
Despite their small stature, these little piñatas actually fit quite a bit inside! The confetti (available in rainbow brights and beautiful gold & silver metallics) added even more fun to the colourful hidden surprise!
Let me show you how I went about creating the bags
The piñatas themselves come plain for you to decorate yourself. They are made from a sturdy card which is uncoated on the outside and coated on the inside for a nice finish. I traced around a circle onto some pink cardstock, which I then cut out and adhered to the one side. This will be the 'back' of the bag, which will be against the child's body.
I measured a length of ribbon for the strap of the bag and then adhered one end to opposite sides of the circle using Helmar 450 glue. The reason I put the strap on now is so that it will have a neat finish once I applied the fringe tape over the top.
The paper fringe tape comes ready-to-use with double sided tape. Simple remove the paper backing and you're ready to go! Each pack comes with enough tape to wrap one piñata.
To keep a bit of the traditional piñata style, I've layered up some colours, using 'Blossom' and 'Twilight'. Another nice feature of these tapes is that most of them (excl. white, black and metallics) come with two tones of the same colour in a pack, so you can create visual interest with only one pack if you like.
In order for my little bags to be opened and closed, I have used some magnetic tape and popped some on the flap and on the opening of the circle. This is an easy method that doesn't require fiddly fastners for little hands. FYI: See those little holes? They are so you can hang your piñata from the ceiling or add some balloons.
For the outer edge of this bag, I have used gold metallic tape cut to short lengths and layered. TIP: It is easier to add tape over the top of each other than it is to try and tuck underneath the above piece, IYKWIM!
This purple and pink bag has a decorative heart on the front which I created very easily using a simple shape cut from plain white card.
I applied a liberal amount of adhesive over the top and sprinkled a mixture of the colourful and metallic confetti on top. I applied a few more individual confetti bits so it had a even mix and finished it off with a couple of WRMK adhesive sequins and some tiny rhinestones.
As a final flourish, I've run some white fringe tape around the circumference of the heart and then popped it on to some foam tape so it would stand out a bit against the background. So sweet.
The other bag I made using the same method, but this one has a cute floral theme on the front. To make some leaves, I stuck two bits of tape together, fringe facing outwards.
I then snipped around, creating a leaf shape. You'll notice I've left a bit of the middle tape part for the bottom of the leaf.
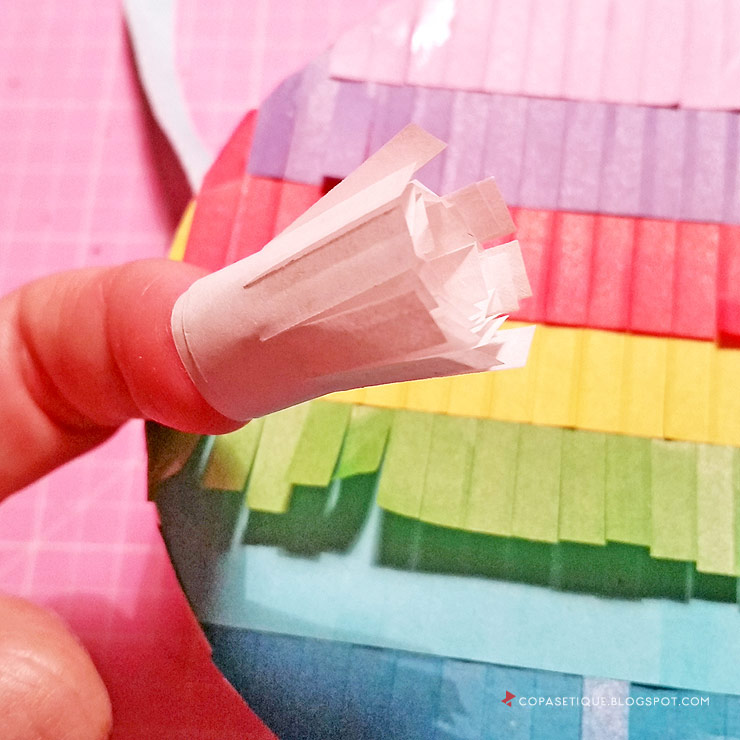
To create the flower petals, I've rolled some white tape around my finger...
and then pulled the 'petals' open...
Pop an oversize rhinestone, button or brad in middle and you've got a flower!
The girls couldn't wait to see what was inside their special bags.
Now for those of you who have special little boys in your life, I also have one more idea for you... how about creating your own teeny drum sets?
Baby K was delighted to bang on his piñata drum!
Cute treasures for cute bubs waiting inside...
For the striped pattern on the side, I first layered light blue tape from a pack of 'Sky' so that the taped part was roughly in the centre....
I then took two strips of the darker blue and taped them, fringe facing out, on either side leaving the light blue in the middle.
The fringe tape had covered the holes, but I poked two more so I could run a bit of cord through them which was attached to my drumsticks.
Look at his little face as he discovers the hidden treats!
Thank you WRMK for allowing me to have such fun with these super cute piñatas!
** Check out the We R Memory Keepers blog here to find out more about these adorable Piñatas PLUS enter the giveaway to WIN some of your own! Winner will be drawn tomorrow.
Thank you so much for stopping by!
Wednesday, 4 November 2015
Just like a Pill - Kraft Plus Challenges
Attention P!nk fans - you are going to adore the new November kraftboard at Kraft Plus Challenges!
Drawing inspiration from an artist who is not afraid to speak her mind and live authentically, I created this page using lyrics from one of her well know tracks.
My DS was very ill recently and we decided to see if he could try and swallow a tablet instead of spoons and spoons of gloopy syrup. I was delighted when he gave it a go and was successful!
To create my title, I wanted to echo the punk feel of many of P!nk's album covers. I wanted a stencilled look, so I created the title in Silhouette Studio.
Using a dauber and black ink, I went over the area, deciding at the last minute to mix up the title using chipboard alphas for the word 'just' instead.
I love the look it produced! For a bit more of a distressed feel, I used some direct misting along with some grungy Prima stamps which I recently added to my collection. The drips are perfect for the look I was going for.
A couple of bright layered elements make up the top section. (I will cover how I got the marbled effect in a post soon!) Simple Stories 'DIY Boutique' is the perfect line for this irreverent challenge ;)
Here is a look at the challenge board. There are a few rules worth noting, so it's worth popping over to the K+ blog to check out all the details.
Happy creating!
Drawing inspiration from an artist who is not afraid to speak her mind and live authentically, I created this page using lyrics from one of her well know tracks.
My DS was very ill recently and we decided to see if he could try and swallow a tablet instead of spoons and spoons of gloopy syrup. I was delighted when he gave it a go and was successful!
To create my title, I wanted to echo the punk feel of many of P!nk's album covers. I wanted a stencilled look, so I created the title in Silhouette Studio.
Using a dauber and black ink, I went over the area, deciding at the last minute to mix up the title using chipboard alphas for the word 'just' instead.
I love the look it produced! For a bit more of a distressed feel, I used some direct misting along with some grungy Prima stamps which I recently added to my collection. The drips are perfect for the look I was going for.
A couple of bright layered elements make up the top section. (I will cover how I got the marbled effect in a post soon!) Simple Stories 'DIY Boutique' is the perfect line for this irreverent challenge ;)
Here is a look at the challenge board. There are a few rules worth noting, so it's worth popping over to the K+ blog to check out all the details.
Happy creating!
Tuesday, 13 October 2015
Boo! Spooktacular Marquee Light
EEk it's almost that time of the year again - one of my personal favourite times of the year.... Halloween! Every year the kids and I look forward to dressing up and decorating the house. It's wonderful to see it gaining momentum here in Australia - more and more retailers are getting on board with the spooky fun.
I couldn't resist decorating this Heidi Swapp Marquee Light for the occasion. It comes with a orange glitter template in the packaging so you don't have to customise it, but if you do (and trust me, it's loads of fun!) you can remove it and use it as a guide for your own pattern papers, like this totally adorbs Simple Stories 'Frankie and Friends' which I've kind've been hoarding since last year, hehe.
I have the Collection Kit, so I had a nice selection of papers to choose from, as well as the cutest character stickers! I have backed a couple with some plain cardstock and then mounted them to the outisde of the light.
The inside is a mix of patterned papers, some stickers and enamel dots. Oh how I miss Glitz giant rhinestones! (The eyeball ones are some of my very favourite Halloween embellies, ever!) The marquee light bulbs are very quick to install and really bring my spooky little friends to life :)
I'm not sure if Aussie retailers are stocking these particular Marquee Lights, but you can find Simple Stories 'Frankie and Friends' on sale right now.
Happy Haunting!
I couldn't resist decorating this Heidi Swapp Marquee Light for the occasion. It comes with a orange glitter template in the packaging so you don't have to customise it, but if you do (and trust me, it's loads of fun!) you can remove it and use it as a guide for your own pattern papers, like this totally adorbs Simple Stories 'Frankie and Friends' which I've kind've been hoarding since last year, hehe.
I have the Collection Kit, so I had a nice selection of papers to choose from, as well as the cutest character stickers! I have backed a couple with some plain cardstock and then mounted them to the outisde of the light.
The inside is a mix of patterned papers, some stickers and enamel dots. Oh how I miss Glitz giant rhinestones! (The eyeball ones are some of my very favourite Halloween embellies, ever!) The marquee light bulbs are very quick to install and really bring my spooky little friends to life :)
I'm not sure if Aussie retailers are stocking these particular Marquee Lights, but you can find Simple Stories 'Frankie and Friends' on sale right now.
Happy Haunting!
Friday, 18 September 2015
September Kraft Plus challenge
The September 'Tri Hard' challenge over at Kraft Plus Challenges is an awesome one. Combining our love of all things kraft with a fantastic sketch by The Nifty Pixel, it is sure to inspire you! The triangle theme from this year's E2C provided the perfect theme for my hybrid page.
I've used an Ali Edwards digital stamp along with a Just Jaimee mist/paint element and, after planning where they were going to be positioned, printed them directly onto my paper.
The little triangles (which I have been hoarding) were from our E2C goodie bags :) There are also a couple of acrylic triangles from Pink Paislee's Citrus Bliss ephemera pack.
The sketch is below. Check out Emma's incredible work by heading to her blog and if you're a digi scrapper or enjoy dabbling with digital, you can grab the free template while you're there, which can be used for the challenge!
Happy scrapping!
I've used an Ali Edwards digital stamp along with a Just Jaimee mist/paint element and, after planning where they were going to be positioned, printed them directly onto my paper.
![]() |
| Digital materials: Ali Edwards 'What today looked like'; Just Jaimee Dec Storyteller |
The photo booth provided hours of entertainment. I have never laughed my way through complete days like I did in Port Lincoln. Special people, special place.
Happy scrapping!
Subscribe to:
Posts (Atom)